Alike v6/A2 Documentation
A2 Installation
The Alike Appliance (A2) is a purpose built backup and DR solution which can be run as a VM on any major hypervisor, or can be installed directly on bare metal.
The A2 can be installed with one of the following methods:
- XenServer/XCP: XVA
- Hyper-V: VHD
- Other/Physical: Installer ISO
Non-XVA Users Please note: Your A2 system must have at least the following available:
- 1 GB Ram
- 16 GB Boot drive (ISO Install)
- 1 GB NIC
- 2+ CPUs
ISO Installation Steps
The overview of the A2 installation process is quite simple:
- Boot the target system with the ISO Installer*
- Select the target disk, and download the installation
- Reboot and run the initial network/storage config on the A2 console
- Complete the installation and configuration using a web browser
By default, the ISO installer uses DHCP for it's networking.
If you need to assign a static IP, please follow the steps in this KB article.
Step 1, boot from the ISO
XenServer Users:
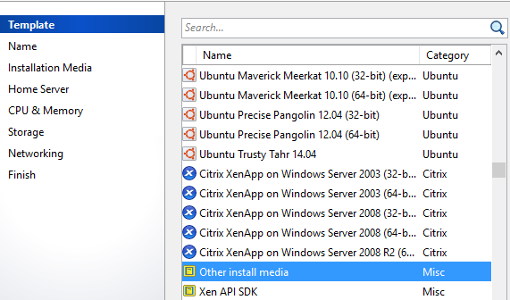
To ensure your A2 runs at optimal performance, and leverages PVHVM,
be sure to select the "Other Install Media" for your VM template type, as seen below:
Once you are ready to begin the installation, boot the the virtual/physical system you wish to install on using the Installer ISO.
Step 2, run web installer
Once the boot is complete, you will be presented with options for a custom image path (advanced users only). If unsure, just hit enter to use the custom image location. If you use a custom path, please be sure the A2 image file is available via http, and include the full path to the image.
The most important question of the installion is the location of your boot disk.
This is almost always "/dev/sda", which should be detected and described by the script.
You must type the full path of the device (eg. /dev/sda)
Note: The installation process will completely overwrite the target disk device (eg. /dev/sda) with the A2 image, so be careful when selecting.
The installation script will automatically connect to the Quadic webservers, and download to download the latest A2 appliance image.
The installation process will take a while, depending on your internet connection. When it is complete, please eject the ISO, and reboot the system. Your system will then boot into the A2 OS.
Console Configuration
System level, and storage settings are configuring on the A2's console. To get up and running you should configure the following items:
- A2 System IP Address
- ADS Storage
- ODS Storage (optional- requires Alike DR Edition)

A2 Network Configuration
By default, the A2 looks for a DHCP issued address. This is the simplest configuration option, so if you can add a DHCP reservation from your DHCP server, this will ensure your A2 always gets the same IP address.
Alternatively, to set a static IP address, choose Option #1 from the console menu, and follow the prompts to assign the IP information desired.
You can also configure the A2's DNS servers, and timezone here.
Please Note: The A2 requires functioning DNS for software updates, remote support, and ABDs to work correctly.
ADS Storage
Your ADS storage is one of the most important settings for Alike. The ADS (Alike Data Store) is the location where Alike will save all of your deduplicated backup data. For your ADS, the A2 current supports the following options:
- Local Disk
- CIFS/SMB
- NFS
- GlusterFS*
Currently this is an advanced/experimental option.
To enable these options, you must turn on "Experimental Options"
from the A2 console->Advanced Option menu.
Please refer to the Data Storage section for more information about supported Storage types, and how to configure them for Alike.